
You can run simple machine learning programs on a traditional single processor with 16 GB RAM. You can do much better on a desktop or laptop with a NVIDIA GPU and 16 GB RAM for around $1,600. Search internet for best laptops for Machine Learning. These also happen to be the best gaming laptops.
1.2.1 The installation of Anaconda Python includes Anaconda Navigator. Use the Windows Anaconda Installer. It is a 64-Bit Graphical Installer. Download from https://www.anaconda.com/products/individual
It is important to check that the download is precise. Any download mistake will create problems later on. We check precise download using a hash with the sha256 algorithm. We will use the method described below for Windows.
We will use the following procedure when downloading the installer onto a Windows computer. Google Anaconda installer downloads. Navigate to the download page. Select the version of Anaconda you wish to download. Click on the download link. After it is complete select Open file. The file will open in Downloads. Shift + Right Click on the file name, and select Copy as path.
We will use Windows Powershell to get the sha256 hash for the Anaconda installer file. At the bottom left of the desktop use Search to locate powershell.exe. Click on the application name and the command line will open. Type get-filehash -path . Add one space. Right click in the space and paste the path to the Anaconda Installer. Press Enter. In a minute the hash produced by the sha256 algorithm will appear.
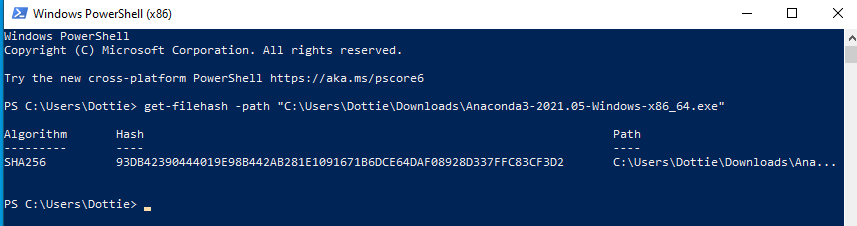
Check the hash number against the hash given on the Anaconda website. The hash should agree with the hash on your computer. Hashes are listed on https://docs.anaconda.com/anaconda/install/hashes/
1.4.1 Double click on the Anaconda installer file in the Downloads folder.
1.4.2 The installer prompts “In order to continue the installation process, please review the license agreement.”
1.4.3 Scroll to the bottom of the license terms and enter “Yes” to agree.
1.4.4 The installer prompts you to click Enter to accept the default install location.
1.4.5 The installer prompts “Do you wish the installer to initialize Anaconda3 by running conda init?” We recommend “yes”.
1.4.6 The installer finishes and displays “Thank you for installing Anaconda 3!”
1.4.7 The installer provides a link to install PyCharm for Anaconda at https://www.anaconda.com/pycharm. I like PyCharm, but this is PyCharm professional which costs a monthly fee. I do not use PyCharm in this tutorial.
1.4.8 Go to your program files on the desktop and look for Anaconda3. Under Anaconda3 you will see Anaconda Navigator. Navigator is where we will create the programming environment with Python, Keras, and Tensorflow.
Table of Contents
Ch1-Installation
Ch2-Conda Navigator
Ch3-Notepad Editor
Ch4-Run a Program
Ch5-Program Explained
