
4.1 The images from your camera are stored in the directory /var/lib/motion . We will upload these images to Google Drive. We can use our phone or pc to view the images from Raspberry Pi. There will be a delay of 10 to 20 minutes between the image being taken, and the image upload to Google Drive. If that is OK and you want to have some fun, this tutorial will work for you. If you just want a dedicated motion activated camera, that you can access through your phone, you can get one online for $60. Just search for Smart 1080 Wifi Video Usb Camera Charger Wall Socket Plug Charger Camera Surveillance Camera on Amazon.
Please note that VNC, and live viewing of the images in a web browser though Motion are not secure. If you open ports to these applications on you router/modem, the ISP (Internet Service Provider) will know it. You will get dozens of hack attempts. Use of SSH to remotely control your Raspberry Pi is relatively safe, if you use good password or passphrase.
4.2 This setup requires Raspberry Pi and camera; with monitor, keyboard and mouse. You will want to install SSH also and DDNS as per Chapter 1. Install Motion program as per Chapter 3. SSH allows you to place Raspberry Pi in your home without monitor, keyboard, or mouse. You just need a power source.
4.3 If you have not already done so, you must change the Pi password from the default. By default the username is pi and the password is
raspberry
. Use a strong password or passphrase. Type in passwd into the command line. You will be prompted for the current password (raspberry). Enter it. You will then be prompted twice for a new password. It will end with the message (passwd: password updated successfully).4.4 We will need a Google Drive account, and we will be installing rclone. Rclone synchronizes files between the Raspberry Pi and Google Drive. Once the images are on Google Drive, we can view them with your Google Drive phone app. We will be adding two shell scripts in cron. One to keep the /var/lib/motion directory from getting too large. The other contains the rclone sync commands.
4.5 We will create a free 15 GB Google Drive account. First create a Google account.
To create a Google account:Second, go to https://drive.google.com
4.6 Second we will install rclone, and configure it. I suggest following the detailed instructions at the webpage https://www.howtogeek.com/451262/how-to-use-rclone-to-back-up-to-google-drive-on-linux/" . Follow the instructions under the heading Installing Rclone. I suggest reading the rest of the article after the installation. However, we will be tailoring the Back Up Script to our needs.
4.7 Create a rclone script in your default home directory.
cd ~


  nano gbk.sh


  (Copy and paste the following text.)


  #!/bin/bash


  /usr/bin/rclone copy --update --verbose --transfers 5 --checkers 8 --contimeout 60s --timeout 300s --retries 3 --low-level-retries 10 --stats 1s "/var/lib/motion" "google-drive:PiDocs"


  (To save modifications and exit. Press Ctrl + x. Press y. Press Enter.)
4.7.1 The entries are defined as follows.
4.7.2 Make the script executable with this command:
chmod +x gbk.sh
4.7.3 Eventually this script will be activate with a cron entry.
4.8 Next, create a shell script to limit the number of image files in the /var/lib/motion directory. Create the script in you default home directory. This is important because too many files in this directory will sync too many files with Google Drive.
cd ~

  nano rmlogfiles2.sh


  (Copy and paste the following. No shebang necessary.)


  cd /var/lib/motion

  d=/var/lib/motion

  fc=$(ls $d | wc -l)

  if [ $fc -gt 20 ]

  then

    fd=$(( $fc - 20))

    counter=1

    while [ $counter -le $fd ]

    do

      sudo rm "$(ls -t | tail -1)"

      ((counter++))

    done

  fi

  cd ~


  (To save modifications and exit. Press Ctrl + x. Press y. Press Enter.)
4.8.1 The code above is described as follows.

4.8.2 Make the script executable with this command:
chmod 700 rmlogfiles2.sh
4.8.3 See about how many files are in /var/lib/motion
ls /var/lib/motion
4.8.4 Run the script rmlogfiles2.sh
bash rmlogfiles2.sh
4.8.5 There should only be 20 jpg or avi files left. Check with:
ls /var/lib/motion
4.9 Now we can test the rclone script. You should see the 20 files getting uploaded to Google Drive. The folder PiDocs will be created automatically, if it does not exist.
./gbk.sh
4.10 Check Google Drive in your browser for the new folder PiDocs. In the folder will be the 20 image files.
4.11 We will now make cron entries for both scripts (gbk.sh and rmlogfiles2.sh). We can run the scripts automatically every so many minutes.
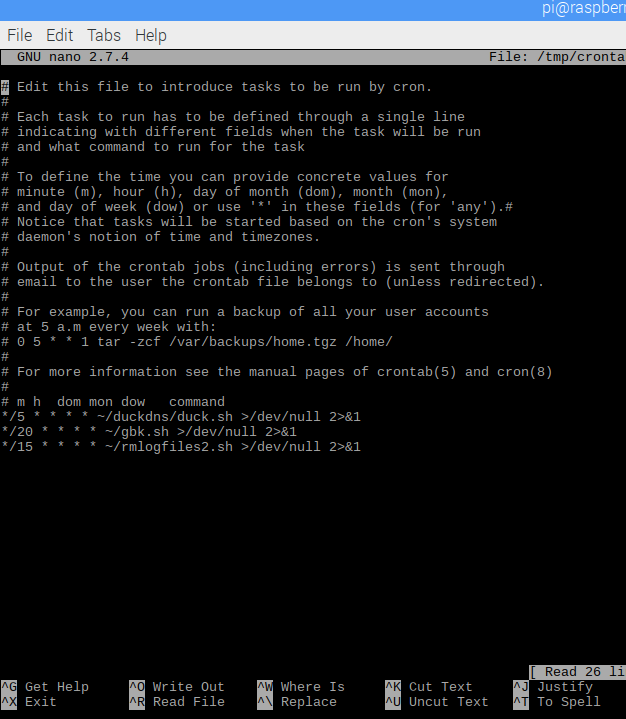
4.11.1 Open crontab selecting the nano editor.
crontab -e
4.11.2 Copy and paste the following lines beneath the bottom of the comments.
*/20 * * * * ~/gbk.sh >/dev/null 2>&1

  */15 * * * * ~/rmlogfiles2.sh >/dev/null 2>&1


  (To save modifications and exit. Press Ctrl + x. Press y. Press Enter.)

  (>/dev/null 2>&1 limits the logging that is done.)
4.11.3 Cron will start itself. If in doubt there is always:
sudo service cron start
4.12. Your setup is complete. Every time you turn on the Raspberry Pi, the Motion app will run in the background, and the cron scripts run at their appointed time. Remember that the Google Drive will fill up with images. There is no script to limit the number of images in PiDocs. I suggest deleting the directory PiDocs from Google Drive daily. It will be recreated and written over every 20 minutes. You have access to Raspberry Pi through the command line SSH. You have access to your camera images through the Google Drive, on your phone or another computer.
4.12.1 It is good practice to check your directories in Raspberry Pi to see how full they are. Your system will shut down if log files take up all the allowed space. Here are two commands to check the space.
(File system disk space usage)


  df
(Disk usage for directories. The largest directories show at the bottom of screen, just above cursor. Do not use -h for human readable. It will not sort correctly. In the following example, we start with /, and proceed to /var, and then to /var/lib.)
du –max-depth=1 / | sort -n


  du –max-depth=1 /var | sort -n


  du –max-depth=1 /var/lib | sort -n
Your setup is complete. The camera will take motion activated pictures, save them to your Pi, and upload them to the Google Drive, where you can view the pictures.
Table of Contents
Ch1-SSH
Ch2-VNC
Ch3-Motion Camera
Ch4-Remote Viewing
