
IMPORTANT: All paragraphs of code are stand alone. You can copy and paste them into PyCharm and have them work. All code has been tested. Two cautions after copy and pasting any code.
FIRST: There is an issue with quote marks. There are two types of quote marks, depending on the font. Curly quote marks and straight quote marks. Only straight quote marks work in PyCharm. If in doubt retype quote marks in the PyCharm editor.
SECOND: Indentation is significant and important in Python. If the code does not run correctly after copy and pasting to PyCharm, check the indentations.
We are writing this manual for first year engineering students who need to know basic programming skills. Typically this will be in an introduction to engineering course. We start with simple examples and proceed to more complex examples. I have addressed common problems to improve the student’s learning curve. My goal is to make the manual as user friendly as possible. All programs have been tested and can be used as templates for your own programs. When done with the manual you will be prepared to program. There are two basic types of programming languages, procedural and object oriented. Python can be used as both. We will concentrate on procedural programming for the first part of the tutorial. This programming is similar to Basic programming in Calc and VBA programming in Excel. But without the spreadsheet. You may ask why Python? Python is capable of infinitely more than is covered in this tutorial. It is used in web applications, science, and machine learning (artificial intelligence). Even though C++ runs faster, Python development times are much faster. Python is friendly. At the end of this tutorial we will spend some time on OOP, Object Oriented Programming. OOP alows us to reuse functions in new ways. By following along in the code, I hope you can understand some of its potential. If you run into a problem do not be afraid to explore the internet!
We will be using PyCharm as the IDE for Python 3.7. IDE stands for Integrated Development Environment, which is a fancy way of saying where you write your code. PyCharm makes programming much easier by organizing your work and putting all the tools at your fingertips. Python programs consist of files with code, custom functions, and built-in functions. (Custom functions are written by you, built-in functions are included in Python libraries.)
Chapter six concludes the first part of this book with a bubble sort sample program. It combines all the elements described in the first part of the manual. It includes, variables, loops, if statements, lists, and functions.
You must first check your operating system to see if Python is installed. If so, what version is it? You should get the most recent version.
1.1.1 For Lubuntu at the command line type:
python –-version (dash dash version)
1.1.2.1 Next complete an update and install or upgrade python. The command python3 will install the latest python3.xxx version:
sudo apt-get update

        sudo apt-get install python3 or sudo apt-get upgrade python3
1.1.3.1 You should also install PyCharm editor. There you will write your code. Plan about 30 minutes for installation. Be sure you have a least 4GB of RAM on your computer to install PyCharm. If you do not want to install PyCharm you can always complete the code on the command line of your computer. PyCharm will save you a lot of time and energy; I recommend it.
1.1.3.2 These PyCharm installation instructions were completed on Linux Mint (An Ubuntu based distribution).
1.1.3.3 Go to Google and type in PyCharm. Download from JetBrains.com.
1.1.3.4 Navigate to Download PyCharm with a Linux link. Click on Community Download and download pycharm-community-xxx.tar.gz. Save the file. The file will go to your Downloads folder.
1.1.3.5 Use Ctrl-Alt-t to open a terminal. Change directories to Downloads.
cd Downloads
1.1.3.5.1 Check the integrity of your download with SHA-256 hash. Check the hash from your computer with the PyCharm website hash which you copy and pasted to your text editor.
sha256sum pycharm-community-xxx.tar.gz
1.1.3.6 Unzip file to /opt
sudo tar –xzf pycharm-community-xxx.tar.gz -C /opt/
1.1.3.7 Change directories to the bin directory in pycharm-community-xxx.
cd /opt/pycharm-community-xxx/bin
1.1.3.8 Run pycharm.sh from the bin subdirectory.
./pycharm.sh
1.1.3.9 The PyCharm IDE will launch on your computer.
1.1.4.1 Accept the terms and conditions.
1.1.4.2 In the Data Sharing window, click Don’t Send.
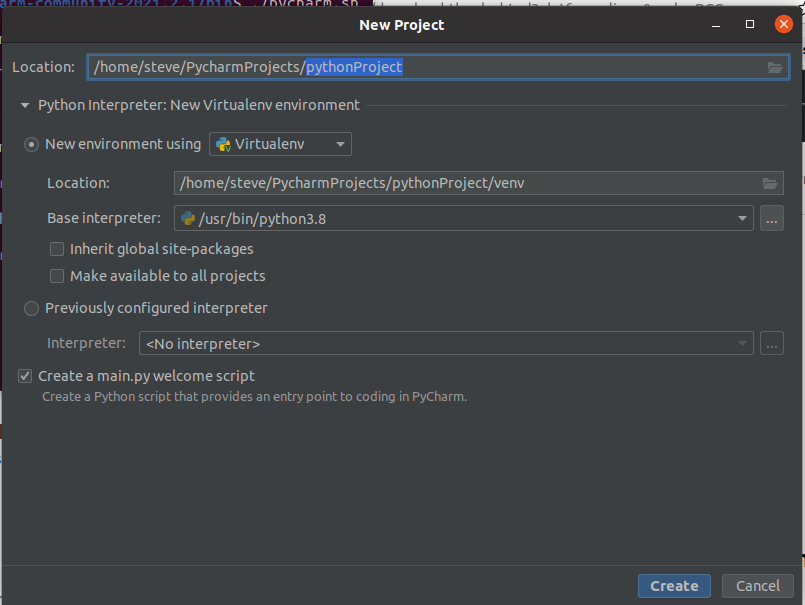
1.1.4.3 Select Create New Project
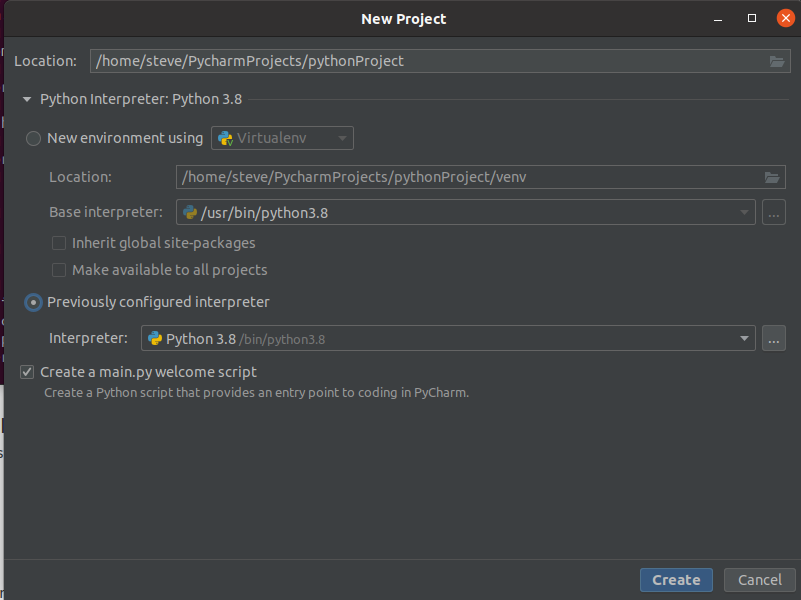
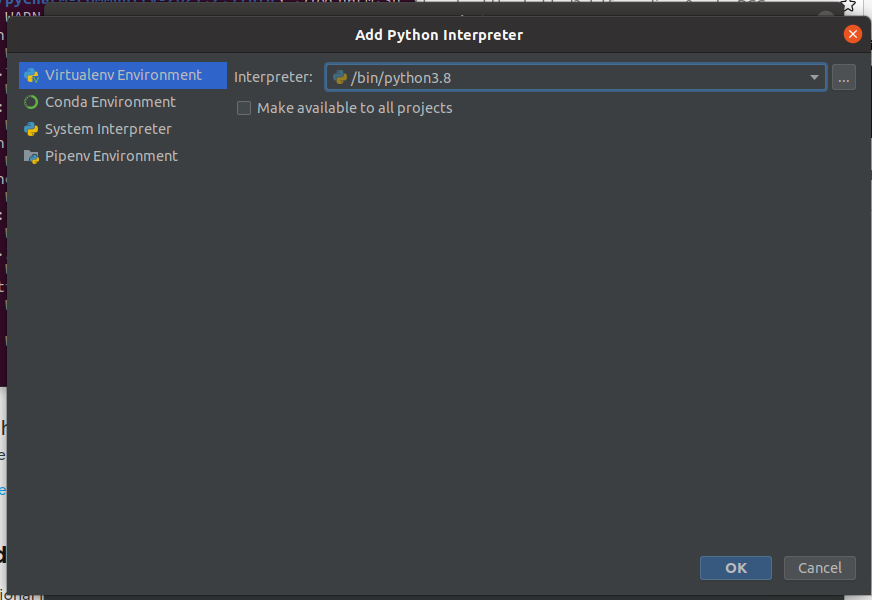
1.1.4.4 Under New Project accept the default project name or type in a new name. Click on Python Interpreter: arrow, if necessary. Select Previously configured interpreter radio button. Attempt to add a path to /bin/Python3.8 as the Interpreter. Open the Add Python Interpreter box. In Interpreter select /bin/python3.8. Click OK. Click OK in Add Python Interpreter box. Click Create in the New Project box. The main IDE project screen will appear. Close Tip of the Day.

1.1.4.5 Skip ahead to 1.1.4.6 and create a file.
Note: You may run into problems with your installation. You must provide a path to /bin/Python.3.8 for your projects. This should have been completed in 1.1.4.4.
If all else fails try the following. Press Ctrl-Alt-s for the Settings page. Select Project –> Python Interpreter from the left side of page. Select a project from the center of the page. Select Python Interpreter -> Add from right side of page. In Add Python Interpreter box select Existing Environment -> Interpreter. In existing environment add /bin/Python3.8. Several boxes will appear in sequence. OK. OK. Apply. OK.
Another thing to try is modifying Run→Edit Configurations. We cannot run the program without Python. So Click the + button to create a new configuration. Select Python. Click on Apply button. Click the Close button. After updating, you can right click on your code window.
1.1.4.6 Create a file to run. From the main IDE page, select a project, and create a file to run. Be sure the upper left project pane is active. Go to File –> New –> Python File. Type in the name of your new file, such as Test1. You do not need the py extension. It is added automatically. Press Enter.
1.1.4.7 You are now ready to add code. Type print(“Hello World”) . You may see a message at the top of your window saying No Python interpreter configured for the project. Click on second radio button, to add the path to an existing interpreter. Add /bin/Python3.8.
1.1.4.8 Return to main IDE page, and run the code. Run → Run → Test1. In the lower left of the main IDE page you will see the output Hello World and the statement Process finished with exit code 0. If the code is incorrect you will get an error message in red. Make corrections and run again.

1.1.4.9 BEFORE CLOSING WE NEED TO ADD A QUICK LAUNCH ICON TO YOUR COMPUTER. Go to Tools→Create Desktop Entry→Create the entry for all users. In the next screen you will enter your password as superuser and click Authenticate. Save your Project folder by File→Save All. Go to File→Exit. The quick launch icon should show on your desktop.
1.1.4.10 If you forget to install the quick launch icon, repeat installation process. (The same way we originally opened PyCharm after unzipping it in 1.1.3.7 and 1.1.3.8)
You can run your programs from the command line using a file, or using the Python command line.
First we will create a Python file in the text editor nano. On the command line type nano helloworld.py. Hit Enter. Add the text print(“Hello World”) to the Nano editor. Write the file with Control-o and hit Enter. Exit nano with Control-x. At the command line type python helloworld.py. The words Hello World will be printed out. You have run a completed program.

Next we will use the Python command line to run the Hello World code instead of the py file. From the Ubuntu command line type python. You will see the Python command prompt. Type print(“Hello World”). Press Enter and you will see the words Hello World.
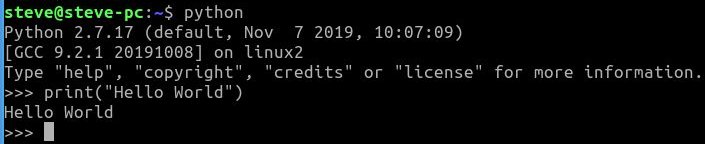
When you are done with the Python command line type exit().
It is always important to save and backup your programs. Remember in Section 1 we saved Test 1 (Hello World) with File→Save All. Both the project and the file in the project are saved. Save->All command saves the Project 1 to the folder PycharmProjects in your home directory. In the folder Project 1 is hello.py. Create a new folder called Python-Backup. Copy and Paste hello.py into the Python-Backup folder. The Python-Backup folder is what needs to be saved and backed up.
I suggest signing up for a free Google Drive cloud account. You can store up to 15GB of data free.
Variable names in Python can be any length and can consist of uppercase and lowercase letters ( A-Z , a-z ), digits ( 0-9 ), and the underscore character ( _ ). Although a variable name can contain digits, the first character of a variable name cannot be a digit.
Variable names are case sensitive, and variable names are lowercase by convention. This means that My_variable and my_variable are different variable names.
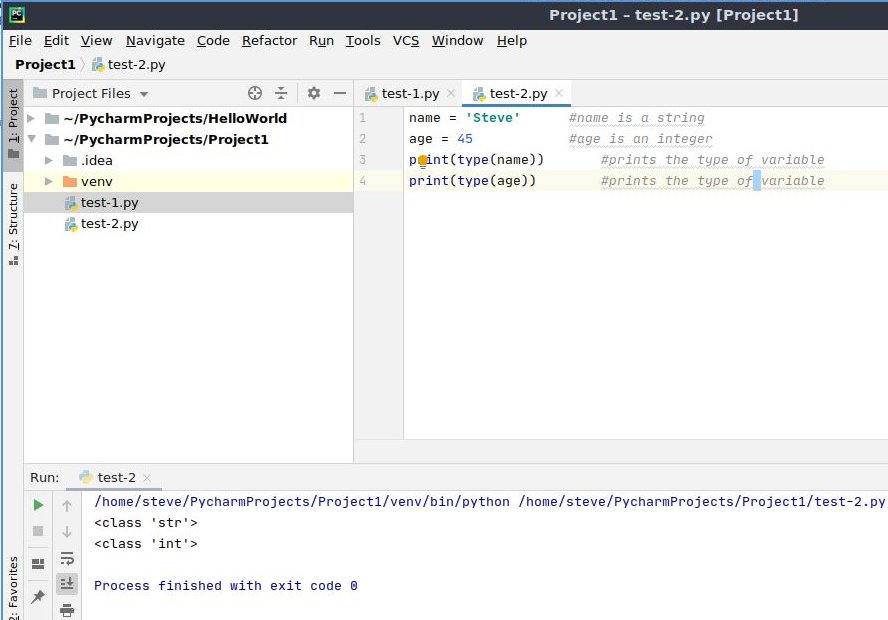
A variable is created when you assign it a value. This is called declaring a variable. The interpreter infers the type of variable by how it is assigned. (Notice the comments which begin with the # sign. They are not interpreted.)
name = 'Steve'           	#name is a string

  age = 45	       		#age is an integer

  number = 8.7	       	#number is float

  print(type(name))       		#prints the type as string

  print(type(age))       		#prints the type as integer

  print(type(number))       	#prints the type as float
We can tell how a variable is assigned by using the type() function.
Go to File→New→Python File and type in a name such as test-2. Hit Enter. Copy and paste the code above into your PyCharm code window and run it.
IMPORTANT: When running code the quote marks must be of the straight kind, not curly as above. You will have to retype the quote marks in PyCharm to make them straight or you will get an error message.
The results will be as shown below.
class 'str'

    class 'int'

    class 'float'
The PyCharm screen is divided into three main parts. The left hand side is the Project Files management pane. The right hand side is the code pane, and at the bottom is the results pane. It is important to know where your cursor is because it determines the active pane. Be sure the code pane is active when running the code.
Eventually you will want to add a new project in addition to the one created when we set up PyCharm. Be sure to save the current project with Save All. Go to File→New Project. Type in the new project name, such as Project2 and accept the default New environment using. Click Create. An Open Project window will appear. Be sure to select Attach. This will add the project to your project list.
We will often use print functions to print out the value of a variable at a point in our program. It is especially useful for debugging. The basic statement is as follows:
x=5

      print('x =  ' , x)

      """

      Sometimes you will see comments like

      this with triple quotes, instead of the # sign:

      """
With the result:
x = 5
I have given an example of a comment with triple quotes, instead of the # sign, in case you see it in other texts.
We also need to input values. A simple input function follows:
myinteger = input("Input an integer:  ")

        print('myinteger=  ' ,myinteger)

        myinteger = int(myinteger)


        # Output

        #	Input an integer:  	8

        #	myinteger=   	8
Copy and paste this to PyCharm, and run the program. The words “Input an integer” will appear in the lower output window. You must type in the integer “8” and press enter for “myinteger= 8” to appear. It is important to keep you cursor pointed in the lower left code box when entering the number, or you will type in the wrong spot.
Please note that 8 is not an integer, it is a string. To make the input a float or an integer, we must specify. The same is true for a float number.
mynumber = input("Input a float number:  ")

        print('mynumber=  ' ,mynumber)

        mynumber = float(mynumber)


        # Output

        #	Input a float number:  	16.1

        #	mynumber =   	16.1
A list contains a list of values assigned to a variable. A list is essentially a single dimension array. Lists can also be two dimensional. Arrays proper are imported in a separate module. We will do that later. We create a list as follows:
mylist = [3,6,9,32]

  print(mylist)

  print(mylist[0])

  print(mylist[1])

  print(mylist[2])

  print(mylist[3])

  #Output

  #	[3, 6, 9, 32]

  #	3

  #	6

  #	9

  #	32
In the second half of the code I have printed individual items of the array. Notice the list starts with index 0.
Table of Contents
Ch1-Starting Out
Ch2-Loops
Ch3-If Statements
Ch4-Functions
Ch5-Variable Scope
Ch6-Bubble Sort
Ch7-Intro to OOP
Ch8-Inheritance
Ch9-Plotting
Ch10-Files
Ch11-Print Format
Ch12-Dict-Zip-Comp
Ch13-Slice Arrays
