
In this series of tutorials we will download, and install Anaconda, Navigator, and Jupyter. (Part I, Part II, Part III) We will configure Anaconda-Navigator for deep learning. This includes installation of Python3, TensorFlow, and Keras. We will test the installation with the Hello World of deep learning, the pima-indians-diabetes database.
I am a firm believer in checking downloads with a checksum hash. This is especially true for large programs, such as Anaconda. I will include checksum instructions in the tutorial. If you feel lucky, don't use the checksum!
For those of you who don't know, I will describe the components of Anaconda in more detail. Anaconda is the name of the overall program that stores programming packages for your use. Navigator is a graphical user interface for installation of packages. (Such as Python, TensorFlow, and Keras.) A group of packages is called an environment. Finally we will install Jupyter Notebook to run the code in the environment we created.
1. You can run simple machine learning programs on a traditional single processor with 16 GB RAM, for around $800. I upgraded my traditional computer from 8GB to 16GB RAM. You can do much better on a desktop or laptop with a NVIDIA GPU and 16 GB RAM for around $1,600. Search internet for best laptops for Machine Learning. These also happen to be the best gaming laptops.
2. It is possible to run your programs for free on the Google Deep Learning platform Colaboratory. it is an internet based GPU running Python3, TensorFlow, and Keras. Here is link to the tutorial. Colaboratory
3. First we will update and upgrade your Linux Mint packages.
sudo apt update && sudo apt upgrade

4. Next we will install Debian (Mint is Debian related) dependency packages for anaconda.
sudo apt-get install libgl1-mesa-glx libegl1-mesa libxrandr2 libxrandr2 libxss1 libxcursor1 libxcomposite1 libasound2 libxi6 libxtst6

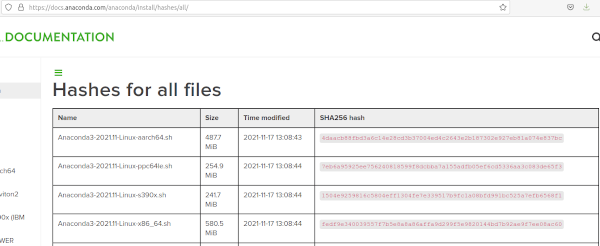
5. The installation of Anaconda Python includes Anaconda-Navigator. Download the Linux installer. It is a 64-bit command line install. Download currently from https://www.anaconda.com/products/individual At the same time copy and paste the hash SHA-256 for the file to a LibreOffice document, for reference. The SHA-256 hash can be found at https://docs.anaconda.com/anaconda/install/hashes/ If the links change, just google the current Anaconda download, and it's hash.
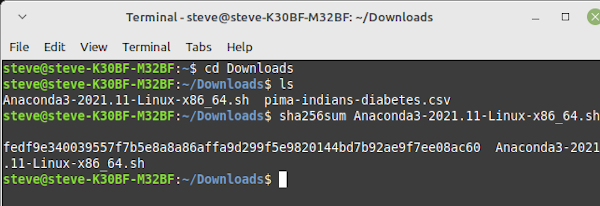
6. We are now ready to create a hash for the download. After creating the hash we will check it against the one from the website. Open a command terminal and type cd Downloads . Type ls and you will see the Anaconda3-xxx filename.
7. We will use the command line to get the SHA-256 hash for the Anaconda installer file. In the terminal type sha256sum Anaconda3-xxx . (Where Anaconda3-xxx is substituted with the actual file name. You can auto complete the filename by pressing tab after the first couple letters.)
8. Check the hash characters against the hash given on the Anaconda website. The hash should agree with the hash on your computer in OfficeLibre Writer. If the hashes are not the same, repeat the download. Hashes are listed on https://docs.anaconda.com/anaconda/install/hashes/
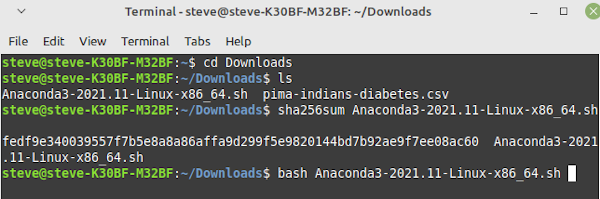
9. Type bash Anaconda3-xxx .
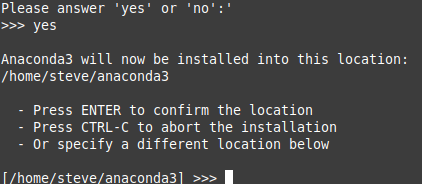
10. After installation begins type Enter, then Yes. Press Enter again for the default installation location.
11. Type Yes to installer initialization.

12. Type source ~/.bashrc . This starts the program.

13. Type anaconda-navigator .

14. This starts the Navigator GUI.
15. Create a desktop launch button. Right click on the desktop and press Create Launcher.
16. For the Name put Anaconda-Navigator. In Working Directory navigate to /home/steve/anaconda3/bin . In Command put /home/steve/anaconda3/bin/anaconda-navigator. (Note that instead of steve, you will use your user name.) Click Save.
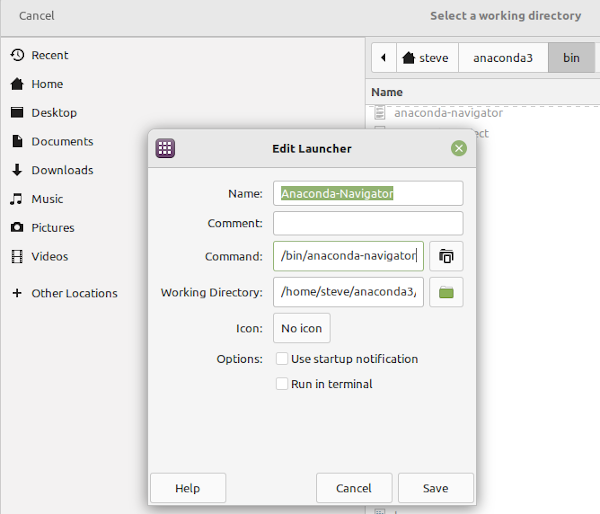
17. You now have a launch button on your desktop. When you click on the launch button a dialog box will appear. Select Mark Executable. The Navigator homepage will open.
SALARSEN.COM
Python Tutorial
Anaconda Linux Install I
Navigator Install II
Jupyter Install III
Program Details
