
First, the name Calc has nothing to do with Calculus. It is short for calculation. LibreOffice Calc is just the name of a spreadsheet program that is very similar to Microsoft Excel. You will often see it with Linux distributions.
We are writing this manual for first year engineering students who need to know basic LibreOffice Calc programming and formula writing skills. Typically this will be in an introduction to engineering course. We start with simple examples and proceed to more complex examples. I have addressed common problems to improve the student’s learning curve. My goal is to make the manual as user friendly as possible. All programs have been tested and can be used as templates for your own programs. When done with the manual you will be well prepared to program. Example programs in section 5.2 Example Program Calling a Subroutine and Function with parameters and section 12.2 Program Calling a Subroutine with Variables and an Array as parameters may be useful templates for students with some experience. All programs have been tested, and can be copy and pasted to your editor window. Note: Sometimes there is an issue with the quote marks in the code. If the code does not work, try retyping the single or double quote marks. Calc takes straight quote marks (as opposed to curly quote marks).
There are many details to learn, but I would like to give you the following overview for programming and for formulas. The Calc spreadsheet consists of two sides: a Worksheet side, and a Calc Basic Code Window side. Basic programs on the Code Window side consist of subroutines, custom functions, and built-in functions. (Custom functions are written by you, built-in functions are included in Calc.) Subroutines can stand alone, or call other subroutines, custom functions, or built-in functions. Custom functions can be used in a Basic subroutine or in the Worksheet. Built-in Basic functions can only be used in the Code Window. Algebra on the Worksheet side can be performed using custom Basic functions, built-in Worksheet functions, and formulas. (It is important to note that built-in Basic functions and built-in Worksheet functions are not always interchangeable. You must look up the definitions for the function you are using.) Worksheet formulas consist of algebraic expressions, custom Basic functions, and built-in Worksheet functions.
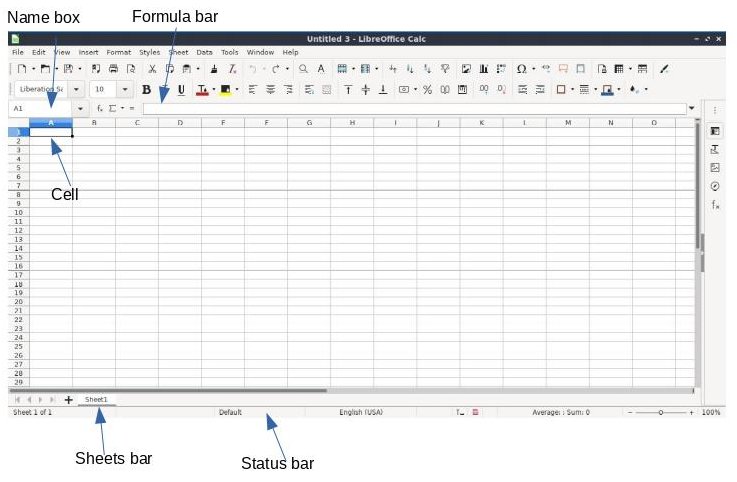
Active Cell: This indicates where you will be typing.
Column Letters: Letters indicate which column the cell is in.
Formula Bar: Allows you to edit text in the active cell.
Name Box: Allows you to name a cell or range of cells.
Row Numbers: Numbers indicate the row the cell is in.
Sheets bar: Shows number of each sheet, and which sheet is active.
Open Calc and you will see a Worksheet as it appears below. See if you can find the parts of the screen listed.
It is important to see that text is inserted in the Active Cell and in the Formula bar at the same time when you start typing. Click on Cell A3 and watch the Formula bar. Type in the words First Name=. Next, click on C3 and then click on the formula bar. Watch cell C3. Type your first name in the Formula bar, and you will see the letters appear in the cell C3. You can make corrections, additions, or deletions in the Formula bar and they will show up in the cell. Corrections made to a cell must be edited in the Formula bar. Check out the screenshot below.

Now we will save from the Worksheet. Go to File -> Save As. Type in a Name for the worksheet. Select Documents as the folder to save in, and select ODF Spreadsheet (.ods) in the lower right hand corner. will now read Test1. Your window should look similar to the screenshot below. The project is saved. Note that when we use Save or Save As in the Worksheet or Basic Code Window, we are saving the whole Workbook. The Workbook includes both the Worksheet and the Basic Code Window.

We encourage you to experiment when beginning Excel. It is important to try as many things as possible. If you mess up, just click on Edit-Undo:
For each type of statement I have provided a general form to follow. The problem with making a program work is that the details must be correct. The general form of the programs only gives you a general idea of what the statements look like. These general forms will not run by themselves. The test programs I have provided will run by themselves and have been tested. You should use these test programs for examples when running your own programs.
Parentheses which you see are required. Brackets are not to be inserted in your code. Brackets indicate optional text. In the function listed below, the parentheses around the parameters are required, but the statement [Exit Function] is optional.
Function name (par1, par2,par3)
instructions
name = expression
[Exit Function]
[instructions]
[name = expression]
End Function
The terms parameter and argument can be used for the same thing: information that are passed into a function.
From a function's perspective:
A parameter is the variable listed inside the parentheses in the function definition.
An argument is the value that is sent to the function when it is called.
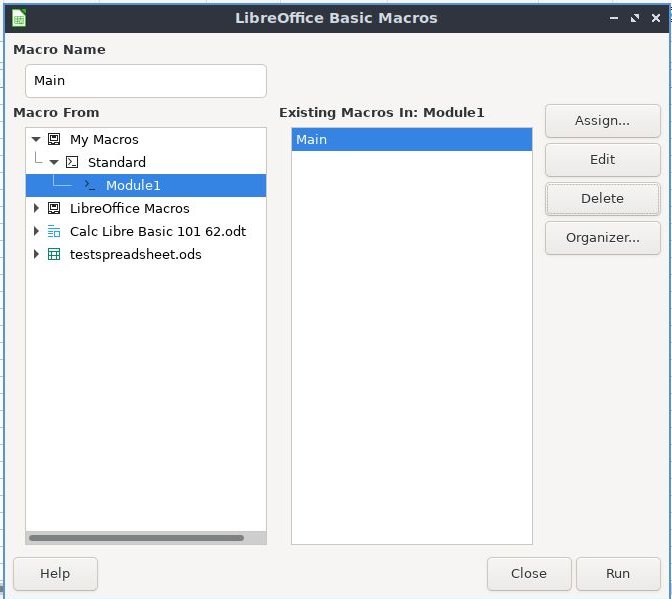
The Basic Editor Screen is where you will write your programs. You get to it in two steps. From the Worksheet window (that shows the spreadsheet) press Alt-F11 to bring up the Basic macros dialogue box. You will see Macro From Module1 on the left side, and Existing Macros In Module 1 on the right side. In Existing Macros in Module 1 you will see a macro named Main. See screenshot below. Click Edit on the right of the dialogue box. The second screenshot below shows the My Macros and Dialogs window. This is where we will type our Basic code.
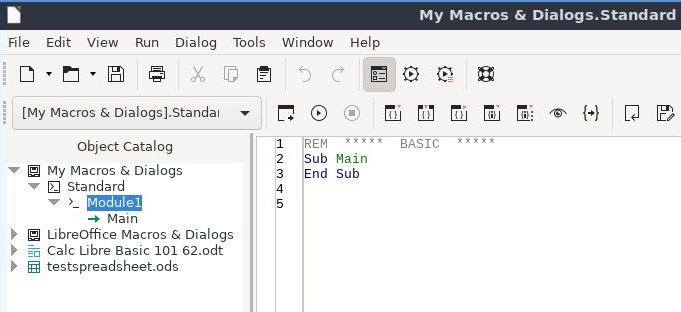
We now see the macro coding window above. Click on the arrow beside Module, and you will see Main as in the screenshot above. Notice in the right panel the name Sub Main. Main is the name of our subroutine (or program) or we will be writing.
Toolbar: The items on the toolbar you will be using are File, Tools, and Run.
Left panel: Is where you will see a list of subroutine and function names.
Right panel: This is where you will write your program code.
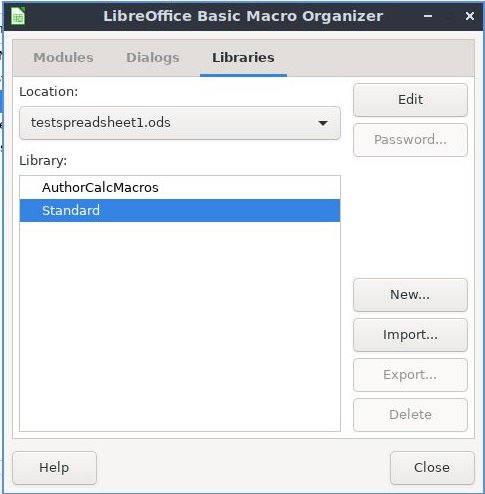
The procedure described above creates storage for macros that is attached to your LibreOffice Calc application. This is not what we want! Create a new library that is attached to your document. This new library contains a new module to hold your macro programs.
Remember that you can always copy and paste macros between modules in different libraries.
We are now ready to write our first program in the Code Window. We will call it Test1(). This program opens a message box containing the words Hello World. Type the following lines in the Code Window. (We will not use the word Main, so type Test1() instead. See the screenshot below.) ALL PROGRAMS HAVE BEEN TESTED. IF YOU COPY AND PASTE FROM THIS PAGE TO THE CODE PANEL AND THE PROGRAM DOES NOT WORK; TRY RETYPING THE QUOTE MARKS!
Sub  Test1()

  MsgBox  “Hello World”

End  Sub
We will now run the program. On the toolbar go to Run -> Run. A message box will appear with Hello World in it. Click on OK to close the box and return to the Basic Editor Screen. You have written and run your first program!
We will now write a second program called Test2(). This program declares the variable x as an integer, sets x equal to 5, and prints out the text x = 5 to a message box. Type this program below Test1().
Sub Test2()

	Dim x As Long

	x = 5

	MsgBox  "Hello  " + "Steve  " + x

End Sub
On the next page is a screenshot of what the Code Window should look like after entering both programs.
Note: There are two programs. So how does Excel know which one to run? You must place your cursor in the block of code containing the program you want to run. Place your cursor in the second block of code and run the program.

Save your work in the Code window. Save your work on the Worksheet. Saving on the Worksheet saves the worksheet and the macros. If you need to save with a new file name, choose the Worksheet and select File -> Save As.
We will now describe the parts of the Test2() program we used above.
Sub Test2()

	Dim x As LongS

	x = 5

	MsgBox  "Hello  " + "Steve  " + x

End Sub
Rules for naming variables. Variable names should be as descriptive as possible.
An array is a special type of variable. A normal variable has one value. An array can have as many values as you want. For example, the declaration Dim myArrayA(2) As Long means we have three spaces or values in the array. The array myArrayA consists of variables myArrayA(0), myArrayA(1), and myArrayA(2). Depending on the memory in your computer, up to 10,000 values per array should not be a problem. Array naming conventions are the same as described for variables.
Below is a test program that includes an array. Note that the array in Sub Test3() below holds four values. The elements of the array myArray are myArray(0), myArray(1), myArray(2), and myArray(3). This is because by default an array starts with element 0. The following program sets each element of the array equal to a number. It then uses a message box to print the value of myArray(2).
Sub Test3()

  Dim myArray(3)   As  Long

  myArray(0)  =  10

  myArray(1)  =   222

  myArray(2)  =   34

  myArray(3)  =   5

  MsgBox   “The value of myArray(2) =   “   +   myArray(2)

End Sub
Below is another example of how an array can be declared. The Dim myArray(1 To 4) As Long declares the four array values as integer and initializes the four array values to zero. Notice that the elements of the array are myArray(1), myArray(2), myArray(3), and myArray(4). Do not let the different methods of declaring an array confuse you. You will see both ways of defining an array.
Sub Test4()

  Dim myArray(1  To  4)   As  Long

  myArray(1)  =  10

  myArray(2)  =   222

  myArray(3)  =   34

  myArray(4)  =   5

  MsgBox   “The value of myArray(3) =   “   +   myArray(3)

End Sub
Run the program and a message box will display The value of myArray(3) = 34 .
Table of Contents
Ch1-Introduction
Ch2-Loops
Ch3-If Statements
Ch4-Functions
Ch5-Subs & Functions
Ch6-Read & Write
Ch7-Operators
Ch8-Built-in Functions
Ch9-Built-in Examples
Ch10-Debugging
Ch11-Running Subs
Ch12-Sample Programs
Ch13-WS Formulas
Ch14-WS Functions
Ch15-Calc Help Page
